
Full list
VRML Interactive Tutorial
Introduction
VRML File Structure
Drawing: Shape node
Geometry Nodes:
|
Box
Sphere Cone Cylinder PointSet IndexedLineSet IndexedFaceSet Extrusion ElevationGrid Example: Chessboard Text FontStyle |
| Material
Textures
Texture Transform |
|
Directional Light
Point Light Spot Light |
Hierarchical Node Structures
|
Group
Transform Collision Anchor Billboard Switch |
Defining and Instancing Nodes
Defining Levels of Detail
Events in VRML
|
Creating Paths between events:
ROUTE
Generating Events based on Timers or User Actions
|
|
Color
Coordinate Normal Orientation Position Scalar Example |
|
Sound
AudioClip |
|
Who Am I: NavigationInfo
Where Am I: ViewPoint |
|
Background
Fog |
| WorldInfo |
|
Coordinate
Color Normal |
Background Node
The background node provides a way to describe the horizon of your world. This is a bindable node.
The background node allows you to define the sky, ground, and panorama images to add an horizon to your world. All items on the background are placed as if infinitely far away from you, i.e., you can never get closer to the background images.
Syntax:
|
The sky is defined as a infinitely large sphere placed around your world. You can define a constant color for it, or have gradient effects.
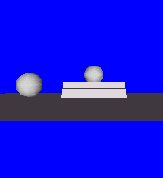 |
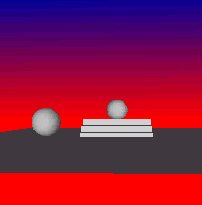 |
The sky color is defined by two fields: skyColor and skyAngle. If you want a single color sky, like the figure on the left above, then you specify a skyColor as the RGB of the desired color, don't specify the skyAngle. The skyAngle is only used when a gradient effect, like the image on the right above, is intended. If you want a gradient effect then you specify the color for the upper pole of the sphere as the first color in the field skyColor. Next you specify at which angle you want a new color (the angle is measured from the upper pole) in the skyAngle. The second color in the skyColor field specifies this last color. The browser should create a gradient between the first and second colors, starting at the upper pole and ending at the angle specified in the skyAngle field. You can specify any number of colors and angles, the number of angles should be the number of colors minus 1. The first color always corresponds to the upper pole. For instance the following combinations were used to create the above images:
Left Image
| SkyAngle | SkyColor |
| 0 (upper pole) | 0 0 1 |
Right Image
| SkyAngle | SkyColor |
| 0 (upper Pole) | 0 0 1 |
| 1.2 | 0 0 0.6 |
| 1.57 | 1 0 0 |
On the left image only one color was specified. In this case no angles are specified because the first color is always the upper pole color. The Sky is all blue.
On the right image from 1.57, roughly 90 degrees, to the lower pole the color used is the last color specified, i.e. red.
Similarly to the sky, the ground is also an infinitely large sphere. The ground sphere is placed inside the sky sphere. The only difference between these two spheres is that in the ground sphere if you do not specify a color, you can see through it, i.e. you can see the sky sphere. Usually, for the ground sphere colors are only provided for the bottom hemisphere.
The following images provides a ground combined with a sky.
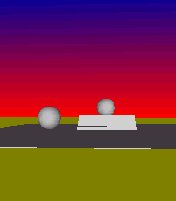
The ground color and angles used were:
| groundAngle | groundColor |
| 3.14 (lower pole) | 0.5 0.5 0 |
| 1.57 | 0.5 0.5 0 |
From 1.57 radians to the upper pole the ground is transparent because no color was specified, therefore allowing you to see the sky sphere. Note that you must specify at least two colors for the ground, otherwise there will be no ground. If you want a ground with a constant color just specify twice the same color. Specifying only one color doesn't provide you with a background.
You can place images on the sides, top and bottom of a conceptually infinitely large box placed inside the ground sphere. Since the box is placed inside the sky and ground spheres, in order to see through these you should use images with transparent parts.
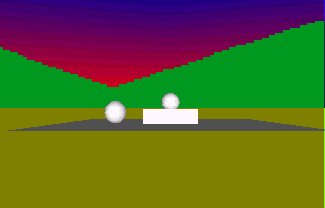
The source code that follows was used to produce the background for the above image
Example:
-
Background { - skyAngle [ 1.2 1.57]
- skyColor [0 0 1, 0 0 0.6, 1 0 0]
- groundColor [0.5 0.5 0.0]
- backUrl "back4.gif"
- rightUrl "back4.gif"
- leftUrl "back4.gif"
- frontUrl "back4.gif"
The image used for the sides of the box is
The border presented in the image is only to give you the notion of the image size, it is not part of the image. Black is the transparent color of this image. Looking at the image one can see that the mountains start only at half of the image, they don't start from the bottom of the image. This is because the desired effect was to have the mountains starting when the ground was over and the sky started.